How to Make a Large Macedonian Drum or Tapan
By David Golber
November, 1980 — Revised November, 2015
CLICK AN IMAGE TO ENLARGE
In November, 1980, I put together a 16-page booklet on the methods of construction of a Macedonian "tapan" (or tŭpan in Bulgarian). A tapan is a large drum, 15- to 21-inches in diameter, made with goatskin heads and played with a heavy wood beater on one side and a thin switch on the other). When Dick Oakes asked if he could put this "how to" booklet on his website as a resource for musicians, I said "Sure!" and quickly added to it from my experiences over the last 24 years. Here, then, is my updated "How to Make a Macedonian Tapan." I thank Dick Oakes for suggesting putting this booklet on line, for typing in the text, scanning the diagrams, and contacting WERCO to verify that they will supply skins. ~David Golber
BE SURE TO CHECK OUT THE BOTTOM OF THIS ARTICLE FOR DAVE'S 2015 UPDATES!
SIZE
For general use, such as playing with an orchestra, I'd recommend a drum about 17 inches in diameter. For playing together with zurlas (very loud wind instruments with oboe-type double reeds), and especially if someone will be standing on the drum, I'd recommend about 20 or 21 inches in diameter. For a 20-inch diameter drum, length should be about 16 inches. I've made ones as small as 15 inches in diameter that turned out reasonably well. Remember that you'll have more trouble finding head skins for a larger drum.
SHELL
 The "shell" is the wooden cylinder. The good ones from the old country were made from a single board about 3/8-inch thick that was bent into a cylinder, overlapped, and held together with nails. The best material was walnut or chestnut. I've been told that the Macedonian government has stopped the making of these drums because they were using up a lot of walnut trees, which makes them very expensive over there now. Most of the drums being made in Macedonia at this time are laid up out of plywood. This can be done very well or very badly. If you want to make a shell yourself using either of these methods, good luck — this is something I've never tried. I make my shells either from used ordinary drums, or else from unfinished new factory-made shells.
Made Out of a Used Drum
You want a bass drum, tom-tom, or field drum of the appropriate size. Try finding them at such places as low-grade music stores or pawn shops. Be sure to tell the proprieters that they may keep all the chrome hardware that is on the shell as you don't need any of it (the hardware may be worth a considerable amount to them, too). Try to get a good strong shell about 1/4-inch thick. Some of the cheapies have a thickness of about 1/8-inch or so — not much stronger than cardboard!
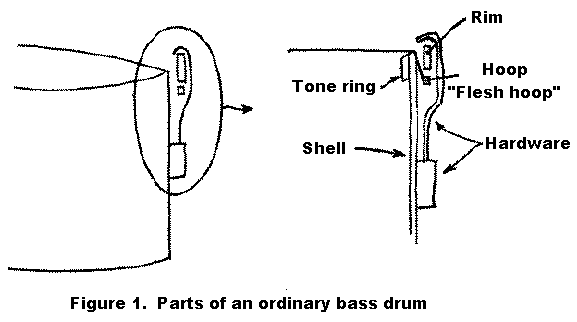
You don't want the hardware, but you will probably want both the rims and the hoops, if they are of wood. Figure 1 shows how the heads are put on a regular drum and gives you some of the nomenclature I'll be using.
The shell that you buy will probably be decorated with sheet plastic "pearl" on the outside. This is usually wrapped around and glued on the overlap and, if this is the case, it comes off in a second. Once in a while you may pick up one that was glued everywhere and it will take forever to peel it off, inch by inch.
Fill the bolt holes in the shell with plastic wood and/or dowels, glue up any places where the wood is separating, sand smooth any rough spots in the rims where the heads will go, and clean up the shell in general. If the shell you have is from a field drum, there may be two depresssions in one rim where the snares were. Fill these up to the level of the rest of the rim with plastic wood.
Putting reinforcing rings inside (if you want to add to what's there already) and finishing the shell are the same as what you do if you start with a new, unfinished, factory-made shell, as described next.
Made Out of a New Shell
After a while, you get to really hate going around trying to find the kind of used shell you want. I much prefer to buy a new, raw, factory-made shell.
The shells I have bought in the past are featureless cylinders of whatever length and diameter, glued up out of seven or eight layers of fine hardwood plywood, and about 1/4-inch thick. They can definitely be very nice stuff to work with. Woodworkers' magazines may have ads from companies that make these cylinders.
What has to be done to one of these shells is:
- Cut the shell to length.
- Glue "tone rings" inside at the two ends and one between the two ends for extra strength. For both the reinforcements and the tone rings, I use pieces of the same material as the shell, about 1 1/2-inches wide. If the raw shell is long enough, you may be able to use the scrap you cut off when cutting the shell to length.
- If you are working with a used shell, the tone rings will already be in place. You may want to use one of the old rims for the extra reinforcing ring down the middle.
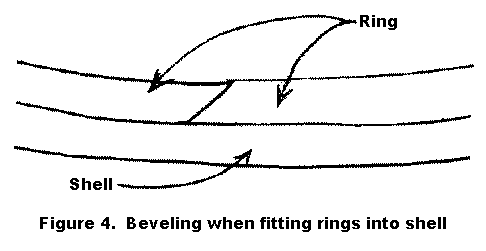
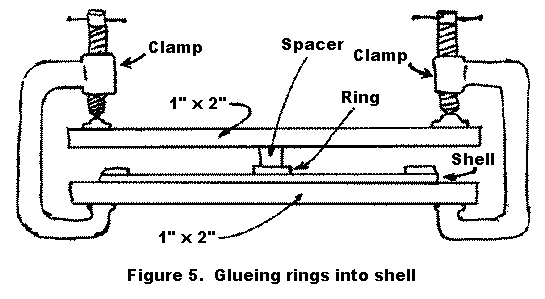
- There are a few tricks to glueing in the rings. First of all, do the center one first. Each piece starts off too long to fit inside the shell. Cut it open and bevel one end (see Figure 4). Carefully cut the other end down with a beveled end until the whole thing fits in such a way that pressing it into place presses the bevels against one another and presses the rim against the inside of the shell. If you take a little too much off, don't panic — cut a little wooden wedge and force it between the ends. The arrangement in Figure 5 is a good way to clamp up the assembly while the glue dries. (It helps to have a lot of C-clamps.)
- Fitting and glueing the rims inside the two ends of the shell works the same way, except that it's easier to work at the ends than at the middle.
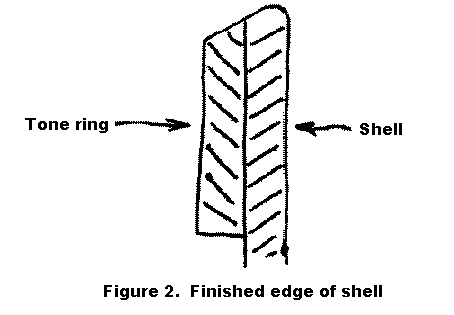
- Shape the ends where the tone rings are located and sand smooth. Figure 2 shows the desired shape at the edges.
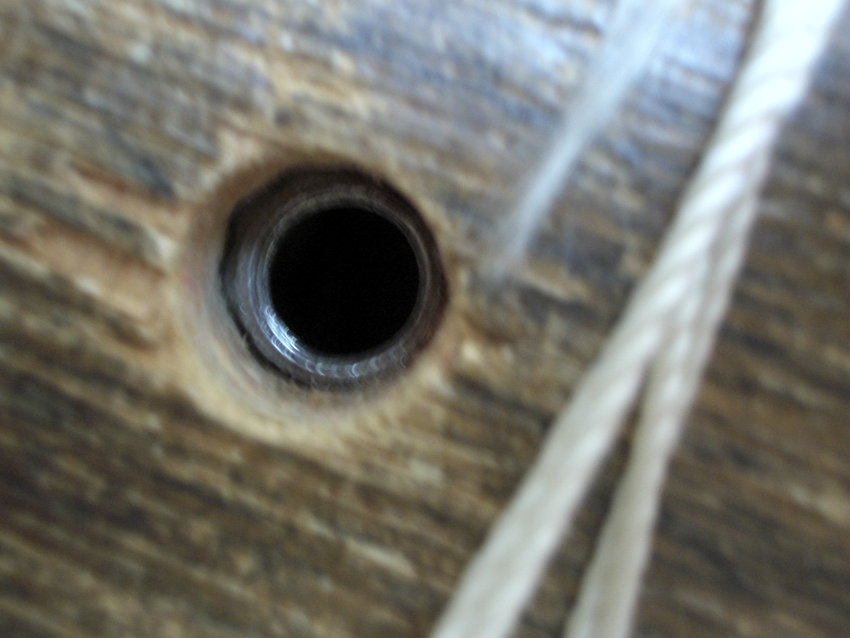
- Drill air holes as desired.
- Equidistant from both ends, I drill three holes about 1/4-inch to 3/8-inch in diameter, spaced at the points of an equilateral triangle with sides about 2 inches long.
- Sand the outside, stain, and finish.
- Attach hardware for the straps.
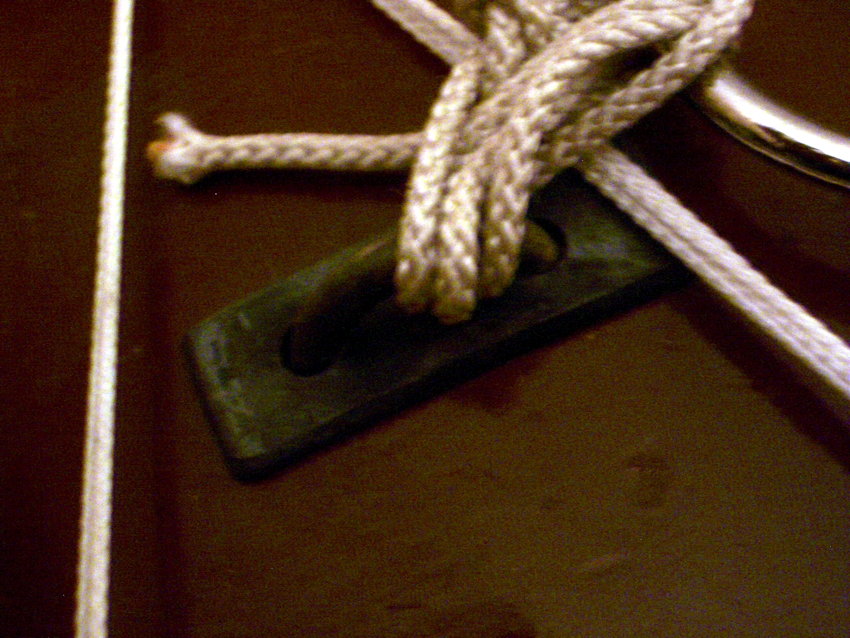
- For points to which the straps are attached, I use the little metal doodads that you get in the hardware store for fastening copper pipe against a wall. I use bolts through the shell and through some scraps (from the rims) inside the shell. Washers, nuts, and a drop of glue on the nuts keep them from working loose.
- The maker's name and address should be written on a piece of paper glued inside so as to be visible through the airholes.
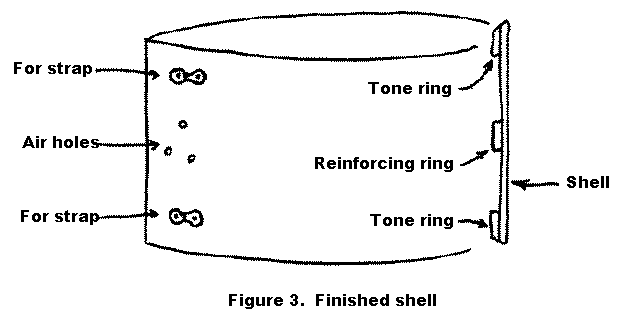
- Figure 3 shows a completed shell.
HOOPS
The space between the hoop and the shell must be wide enough for two thicknesses of the head, plus the cords used to lace up the drum. I usually allow about 1/10-inch of space all the way around.
Using the original hoops
You may not be able to use the original hoops at all. Most drummers now use plastic heads that come already attached to metal or plastic hoops. I've never tried to use these. There's also a good chance that the original hoops from the drum will be too tight. It can be very upsetting to find out just as you're putting the drum together that the hoops with skins and cords will not fit over the shell, so check carefully. If you do have nice wooden hoops that you got with the shell but you think they are too tight, you can try enlarging them. Look for the scarf (diagonal) joint where the hoop was glued together. Open it up carefully with a knife. Soaking in water may help. Then pull it out and glue it back together using the same methods for making new hoops (see below).
You also can order wooden hoops (sometimes called "flesh" hoops because they are used for calfskin heads) at a drum store. You will probably want to get one definately larger than your shell and cut it to fit. You also can use a rim sawn down the middle; you may have to enlarge it as described above.
Making hoops
You can try making hoops by bending a nice piece of wood. I've made hoops as small as 12 inches in diameter out of clear pine molding. You can find books in the library on wood bending. The basic point is that you should back up the wood with thin sheet metal (for instance) to keep it from bursting on the outside of the bend. I also have bent some very nice hoops out of 3/8-inch oak, but it was a big-deal process!
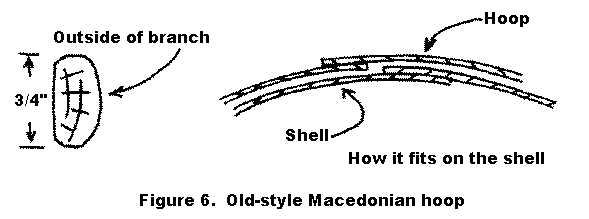
Hoops for old-style Macedonian tapans were made from green branches. From what I've seen, one starts with a green branch about an inch and a half in diameter, and splits off and whittles until one has a piece with a cross section as shown in Figure 6. This then is bent into a hoop and fitted to the shell. The hoop is joined with an overlap, which is usually held with a small nail or two and then bound tightly with cord. The hoop sits on the shell in such a way that the place where the hoop overlaps itself fits neatly into the place where the shell overlaps itself, as shown in Figure 6.
My standard practice is to make hoops by cutting down and glueing up slices out of the same kind of stuff I use for the shells themselves. Obviously, the hoop must be made out of a slice of a bigger shell than the one one you're using. For instance, for an 18-inch drum, you would start with a slice out of a 20- or 22-inch shell, about 3/4-inch wide.
Cut it open (make the cut on the place where the outer ply has a joint) and bevel one end with a bevel about 3 inches long. Now, the problem is to get the hoop glued up with exactly the size you want. This isn't easy, because the thing is very awkward to measure. Here's what I do: Clamp the hoop tightly against the shell. Mark the end you've already beveled in a few places and mark the other end where it overlaps the bevel. However, and this is important, put the marks about 6/10 of an inch farther along the hoop! Then cut to length and bevel the second end. Glue it together with the marks coinciding. This will give you about 1/10-inch space all the way arround, between the shell and the hoop. (Circumference = two times pi times radius, and two times pi is about six, right?)
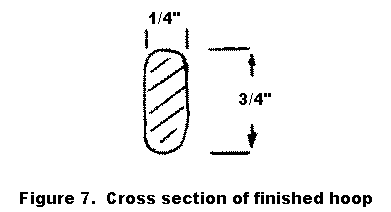
After the glue has dried, plane the edges of the hoop even and sand and plane the corners nice and round. I smear a little extra glue on the joint and wrap it tightly with dental floss. Figure 7 shows the cross section of a finished hoop.
HEADS
For drum heads, use natural "rawhide" goatskin. "Rawhide" in this case is not the same as saying you use the skin directly from the animal. Various things have been done to it, none of which I have the knowledge to tell you anything about.
The best source of natural skins these days seems to be an ethnic musical instrument company in Florida: Mid-East Mfg., Inc.; 7694 Progress Cir.; West Melbourne, FL 32904-1655. Toll-free: 800/673-1517. Phone: 321/724-1477. Fax: 321/952-1080. Website: www.mid-east.com. Mid-East has goat skins up to 36 inches in stock at all times. Another possible source is the world's largest manufacturer of tambourines: White Eagle Rawhide Mfg. Co. (WERCO); 216 W. Campus Dr.; Arlington Heights, IL 60004-1480. Phone: 847/392-8966.
Nomenclature
Flesh: The side of the skin that was against the goat.
Hair: The side of the skin that was on the outside of the goat.
It is usually easy to tell the "hair" side from the "flesh" side when the skin is dry.
Patching
You can do a fair amount of patching. You may want to patch a hole in the skin or a place at the edge where the skin isn't quite large enough. As glue, I recommend a flexible synthetic rubber glue called Devcon Rubber Contact Cement, which creates flexible, durable bonds, and should be available in tubes at your larger hardware stores. To do your patching, cut a patch out of an unused part of the skin and lightly sand both the patch and the skin itself where they will go together. Glue flesh side against flesh side and let it dry. I've done some substantial patching, particularly at the edges of skins that are a little small but otherwise good, and I've found that it holds up pretty well, even when the skin is soaked.
Thickness
For a 20-inch drum, I recommend between ten and fifteen thousandths of an inch for the thin head and about twice that for the thick head. (I don't usually use a micrometer — I just feel the skin, but how can I write down the feel?) I've come to believe that the smaller the drum, the thicker the head, otherwise you get too much ringing. The thickness, flexibility, and feel of the two skins are what really make the sound of the tapan. I wish I were more able to describe what I think are proper skins, and I wish I were surer of my understanding of what is proper, but with experience you will understand what I mean.
Diameter
How large a circular disc do you need for the heads? To check, cut a scrap from an unused part of the edge of the skin, soak it, and wrap it around the hoop in the way it will go on the finished drum, as described below, including the twigs. By measuring how this fits, you can figure out how large a circle you need. As a rule, I figure I need six inches more in diameter than the diameter of the shell. That is, for a twenty-inch diameter shell, I figure on a twenty-six-inch diameter circle. You can, for safety's sake, add a little extra and trim it off when you are actually a the stage of putting the skin on the hoop.
Preparation
Look over the skins very carefully. Hold them to the light. A very transparent spot may not necessarily be thinner or weaker. Mark the center and lay off the circle with a soft pencil. Don't cut it out yet. Patch whatever you think needs patching with Devcon Rubber Cement and scraps from the unused part of the skin. Take the thin head and gently sand off the fuzz and bits of the under-skin (or whatever it is) from the flesh side. Do this sanding outside your house, unless you like the smell of a tannery. Do this process on a smooth surface because, if there are little projections on the surface on which you are working, you can sand right through the skin before you know it! If you think that the thin skin is too thick, you actually can try to thin it down by sanding, but be very careful. On the inside, or flesh side, at the edge, write the word "inside" in a couple of places. After the skin is soaked, it is sometimes hard to tell the two sides apart.
PUTTING SKINS ON HOOPS
Mounting a head on a hoop is called "tucking." I will describe the process for one head. What I do is to put on one head at a time, force it into place, let it dry, take it off the shell, then do the other head. This may not be the traditional procedure, but I feel it's a little less risky and lets me do my work without any help.
If you wish, it is possible to mount both skins on both hoops and mount the hoops on the shell all in one operation. I have friends who have done this. You will definitely need at least one strong helper. The problem is to make sure that both hoops with the heads mounted on them are forced most of the way into position on the shell before you start punching the holes for the cords to lace up the drum. If you punch the holes when the heads are still far from position, as you tighten the cords and the heads move into position, the holes will be torn larger by the cords.
Put the skin to soak in the bathtub in cold water. Unless you've ended up with some rather unusual stuff, a few hours will soak the thing completely.
Meanwhile, gather some nice green twigs. After scraping off the bark, they should be about 1/8 inch in diameter and in pieces about eight inches long. They are much easier to work with when they are nice and smooth. The ends should be blunt.
When the skin is completely soaked, lay it flat. Measure to see if it has substantially changed size. Sometimes it shrinks about 1/2 inch across a 26-inch circle in the direction parallel to the backbone. Cut out the circle, adding some if there is shrinkage.
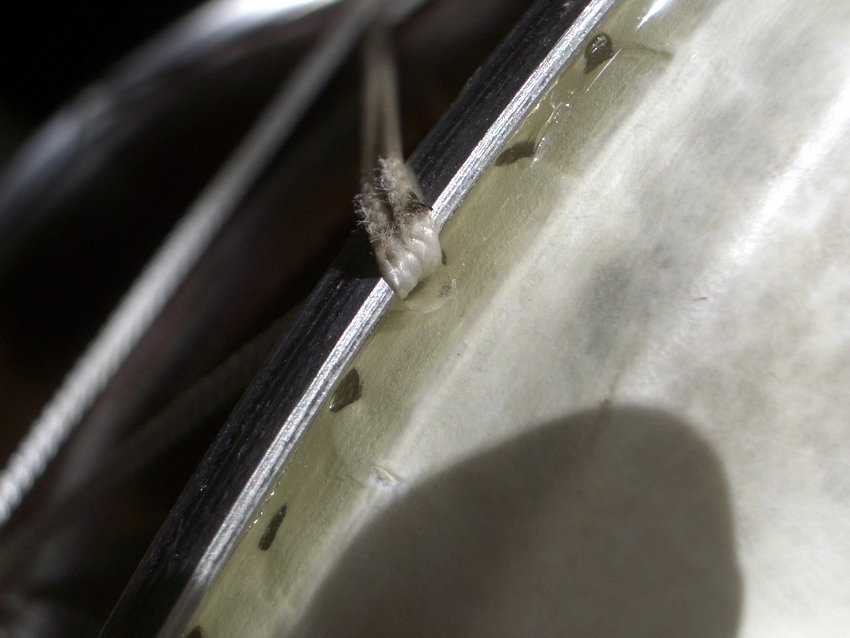
With a sharp knife, cut little slits about 1/8-inch long, parallel to the edge of the skin, about 1/4 inch from the edge, and at a spacing of about an inch, all the way around the skin. Weave the twigs in and out of these holes, all the way around. Keep the skin good and wet, dunking it in more water if necessary.
Lay the skin flat, flesh side down, which will result in the hair side being on the outside of the drum and the hair side being aginst the hoop. Place the hoop on the skin. Now you are ready to do the actual tucking, forcing the skin into place on the hoop.
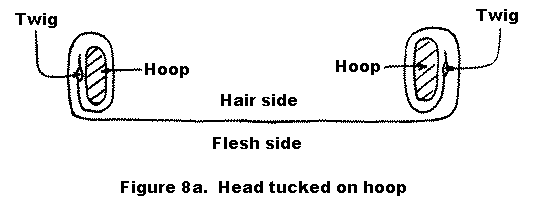
With the object being to get the skin into the position shown in Figure 8a, push the twigs into position with ends of your fingers. Go round and round the head. Get it started at several places and then go back to get things all the way into position. One of the advantages of the twigs is that they can be manipulated through a layer of skin. I find that I use my teeth a great deal in manipulating the twigs into place (surely this is a sign of having found a real traditional method!). You also should be pushing the skin back and forth along the hoop so that extra slack is neatly distributed along the hoop without folding back over itself. There may be a few minor loose or baggy spots when you're finished, but these will be pulled up tight when the hoop is forced over the shell. The whole tucking process takes about half an hour.
You want to get the twigs into position and have the correct tension of the head across the hoop such that you can force the head and hoop over the shell and into position as described below. Forcing it all the way into position should take a great deal of force: two strong men grunting, or the method I use below. As you are tucking the head onto the hoop, try the thing on the shell. If it is too loose, take it off the hoop, trim a little bit off the edge of the head and start over. This isn't as much trouble as it may seem and it is important to have the heads sit correctly. There should be a little less tension for a smaller drum or a thicker head because it will be harder to get as much stretch while forcing the hoop into place.
Using the twigs in this way is the traditional Macedonian way of putting the heads on the hoop. It turns out to be very easy and quick, and results in a really solid attachment of the head to the hoop.
ONE WAY OF FORCING HOOP AND HEAD INTO POSITION
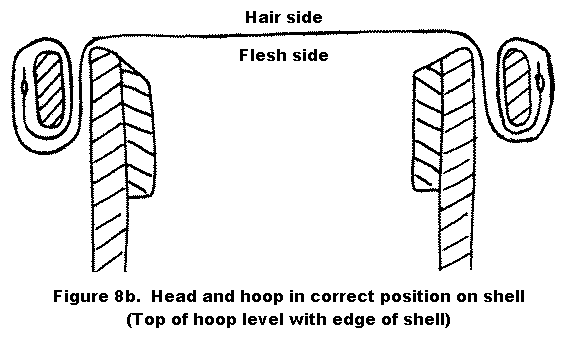
The hoop on the finished drum should sit with its top edge just level with the edge of the shell and, therefore, just at the level of the skin, as shown in Figure 8b. If the hoop is any higher, you will not be able to get the stick down flat on the skin. This is particularly important on the "high" side, that is, the side with the thin skin which is beat with the thin stick. If the hoop is substantially below the correct position, then there is a collar of skin from the edge of the shell down to the hoop. This means that when you tighten the ropes, the force mostly goes into trying to stretch this collar, so that you cannot stretch the skin properly. After drying, the skin is not flexible or elastic, so you want to force it into its final position while wet and let it dry in that position.
Make a bunch of hooks from S-hooks, which you can buy at any hardware store. Heat them with a torch, twist one end ninety degrees, shorten the hook end with a hacksaw, and file the cut end smooth. Use the hooks in pairs, with one over the far end of the shell and the other over the edge of the hoop. (You may want to try various sizes of S-hooks before you decide which you want to use.) Use a separate piece of rope for each pair. Use pieces of old rubber innertube as a pad between the hook and the shell and between the hook and the hoop. You should make at least sixteen pair (32 hooks).
Now lay the hoop, with the skin tucked onto it and still soaking wet, into position on the shell. Get all the hooks in place before you try tightening them very much. After they're all in place, start pulling. Unless the skin is very tight and strong, you should be able to pull the hoop into position with some grunting and groaning. It might be nice to have a big strong friend help at this point. Keep an eye on the hooks and padding to see that they don't poke into the head.
Take the head on the shell inside and let the head dry slowly for a couple of days. Don't try to rush it by putting it in the sun!
After the head has dried, take it off the shell, put it in a corner, and do the other head in exactly the same way. When you've finished both heads, you're ready to lace up the drum.
ANOTHER WAY OF FORCING HOOP AND HEAD INTO POSITION
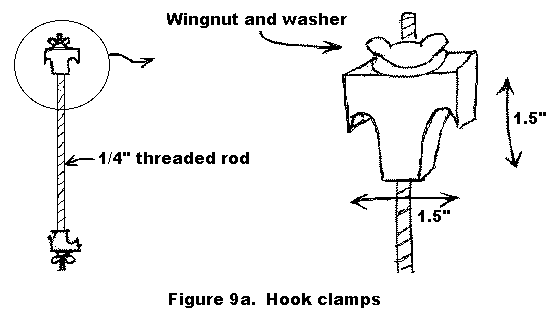
I have another way of forcing the heads into place on the shell that I like very well. I made a number of hook clamps, as shown in Figure 9a. The wooden hook block has two different shapes of hooks cut into it to fit various shapes of hoops. If you have the necessary woodworking tools, make at least sixteen blocks to be put together to create eight of these clamps. Better to make thirty-two blocks to create sixteen clamps.
Purchase quarter-inch threaded rods at your local hardware store and hacksaw them into lengths about four inches longer than the length of the longest shell you ever expect to use the clamps on.
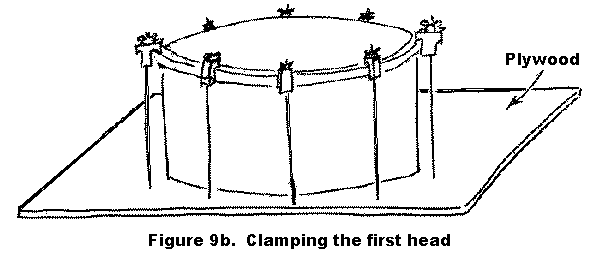
Get a piece of plywood large enough on which to stand the shell on end. Drill eight (maybe sixteen) quarter-inch holes in the plywood about a half-inch out from the shell. Push one end of each of the threaded rods through a hole in the plywood and using a washer and a nut, bolt each rod underneath the plywood. (Figure 9b should make all this nonsense clear.)
If the hooks will fit nicely over the edge of the shell, the plywood is not necessary. Instead, hook one end of the clamp over the shell and hook the other end over the hoop and skin you are forcing into position.
Take the head, still soaking wet and tucked on the hoop and put it in position on the end of the shell, hook the hooks over the hoop, and tighten the wing nuts to force the head into position with the hoop just below the edge of the shell.
Now let the head dry for a couple of days, just like you did with the other method. Then do the other head the same way.
By the way, if the shell is rough-made and the two ends are different in shape or size, you should keep track of which hoop and skin go over which end!
LACING
The cord I've been using is "Nylon Seine Twine," available in any good hardware store. The stuff I use is a bit under 1/8 inch in diameter, is spiral twisted, and has a breaking strength of about 200 pounds. If I could find it, I would prefer the same stuff but braided.
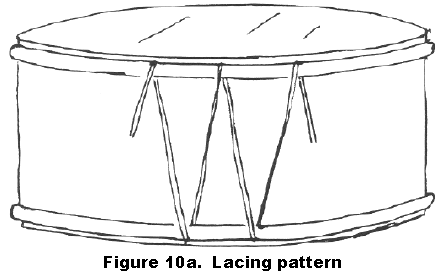
The lacing is done in a zigzag pattern, as shown in Figure 10a. The entire lacing is done with doubled cord. Calculate the length you'll need, making sure to allow for the fact that the cord is to be doubled, and allow for an extra doubled end to go around the drum a couple of times in addition to the zigzaging. Then add some more for good measure, as it's a real pain to have to tie knots in the cord. For example, I did an 18-inch drum using just 90 feet of cord and wished I had allowed a little more.
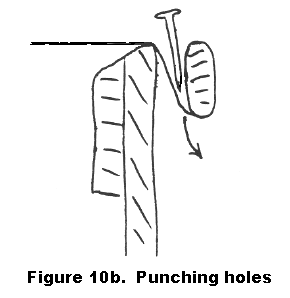
To do the actual drum lacing, start with both heads in position on the drum. If they aren't already there, try using some talcum to help the skin go over the edge of the shell. Lay out the doubled cord, unwinding the cord by letting the spool turn, rather than pulling the cord over the end of the spool, which will result in fewer unwanted twists. To create a needle, straighten a paper-clip, bend it back onto itself, then put it into the bight where the cord doubles back onto itself. Using a 1/8-inch diameter sharpened nail, poke a hole down at the bottom of the space between the hoop and the head for the cord to go through (see Figure 10b). Push the paper clip through and use it to pull the cord through. Continue in a carefully measured, even-spaced zigzag fashion around the drum, avoiding twisting the cord too much (and keeping your temper!). There should be about 3 inches or a little more between the points of the triangles.
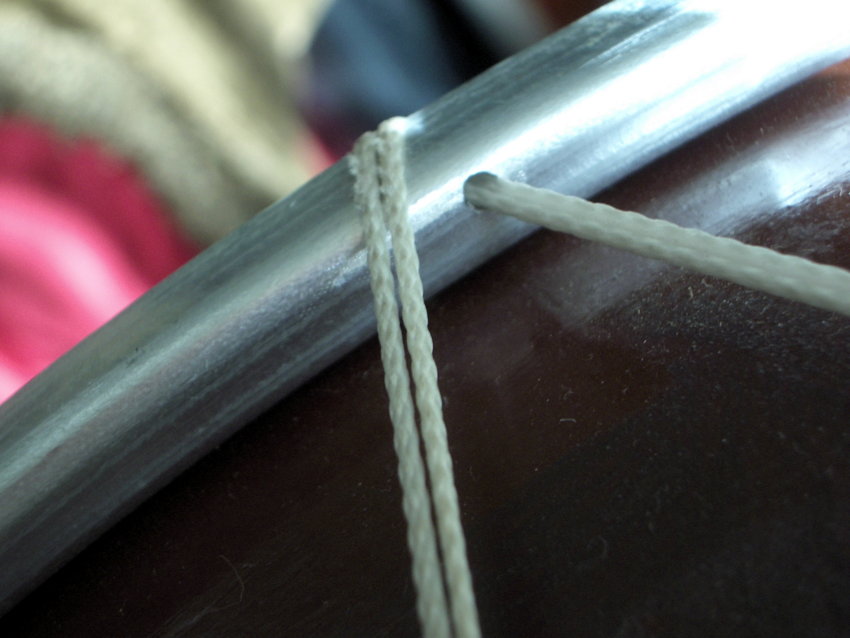
End the lacing at both ends by tying short loops of cord to the doodads where the strap will be attached later, tying the ends of the cord to these loops. Because the metal could fray the cord, do not attach the cord directly to the doodads. You should start and end the lacing at the appropriate points relative to the doodads.
Pull the lacing tight, then do it a second time. Let the drum sit overnight. Pull the lacing tight again. Unless you have some very heavy skins, the drum will tighten up correctly with no more than this amount of pulling. If you have a lot of trouble, you might try dampening the skins, especially the heavy one, and particularly at the edge of the shell, then pulling the lacing tight.
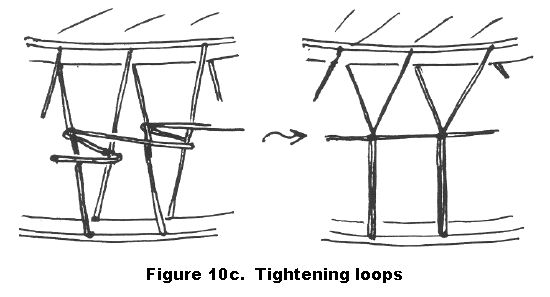
Take the long end of the cord (if there is one — if not, use a separate piece) and make tightening loops as shown in Figure 10c. Pull these tight. It may be sufficient for you to slide these to one end and slacken the tension for traveling with the drum and to the other end to tighten it for playing.
STICKS
For the thin stick, I use a 1/8-inch dowel for the upper, thin-head side. You can buy dowels at any hardware store.
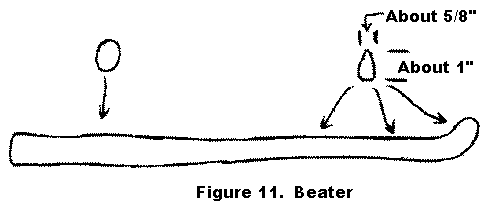
Carve yourself a beater for the lower, heavy side. It is important to realize that this should not be enormously heavy. What you need is actually something quite light that will be fast, whippy, a bit flexible, and still fairly strong. Don't use oak or similar coarse-grained woods, because the grain will disintegrate after you've used it a while. I recommend something like a nice piece of hard maple, but this tends to be a bit heavy and should be thinned down considerably. Figure 11 shows a good shape.
DAMPER
You may want to use a damper laid on the low side of the drum. This is often done by very good drummers with very good drums and is not a sign of an inferior drum. Using a towel about the thickness of a dish towel, fold it to be about six inches wide and run it through the cords of the drum so that it hangs about ten inches down across the head. Strike the beater against the towel. Experiment until you like the sound. It's nice to have a little bit of embroidery on the end of the towel that's hanging down.
CARE
The skins are not delicate; they won't break with normal playing or even if hit very hard with the beater. The danger is in bumping into something sharp. If you travel a lot with the tapan, buy or make a case for it. A good case should be water proof because the heads will go limp in damp weather. Never carry the tapan uncovered in the rain. To revive a drum that's gotten a bit damp, carefully use a heating pad, hot plate, or hair dryer to bring back the taughtness.
Good luck in your Macedonian tapan-making efforts!
David Golber
CLICK AN IMAGE TO ENLARGE
HERE ARE DAVE'S 2015 UPDATES!
The subjects are:
1. Mounting the heads.
2. Clamps.
3. Where to get heads.
4. Plastic heads.
5. Staples.
6. Mounting straps.
7. Cymbal mounting.
1. MOUNTING THE HEADS The heads go on the hoops as described in the old article. Sandy Ward took some pictures when I replaced a head on her drum; they are here: https://sward.smugmug.com/Music/Other/Re-heading-a-tapan/.
You may want to pad the clamps with some rags where they tighten against the wood of the shell (at the end opposite the head you are putting on) to avoid marking up the wood - there's a lot of force involved. Don't use the sheet of plywood I describe in the old article. (Did I ever do that?)
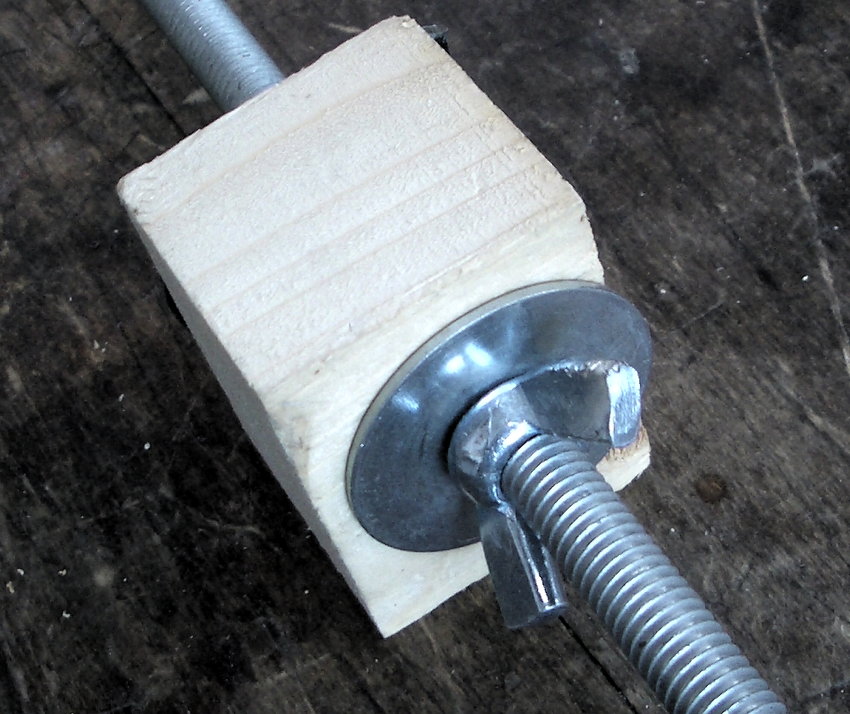
2. CLAMPS I made some new clamps, which I think are really better than the old ones. Here is a picture:

The rod is 3/8" diameter, 2 feet long. Don't make it any smaller or shorter. The washer on the nut side is 1-1/2" diameter. The bent washer is 2" diameter. If your local hardware store (like mine) has a choice, get the thinner 2" washers; the thicker ones are too thick to bend.
3. WHERE TO GET HEADS The skins from Mid-East Manufacturing company (http://www.mid-east.com/) are fine. They sell various sizes and thicknesses.

4. PLASTIC HEADS I recently put plastic heads on a drum. This was a commercial shell, and commercial plastic heads (Remo, I think). So the shell was nice and round and a normal size. So I could buy the normal commercial plastic heads for that size drum. The question was how to mount the heads with cord, rather than the usual hardware. Here's how I did it:
5. STAPLES I recently replaced a (skin) head on a Turkish "Saz" brand drum. The owner says he bought this drum in Athens. He brought it to me to replace one broken head.
This is nice stuff: Shell is about 1/4 inch thick. One piece of nice walnut (I think) bent on a mangle (that's what I call it) - the tooth-marks visible inside. (One of the pictures from Sandy Ward shows what I mean by tooth marks.) Very nicely glued up, and finished. The hoops also bent on a mangle. Again, nice stuff (beech?) about 1/4 inch thick and maybe 5/8 inch wide. Goat skins. Laced up with braded cord, not doubled. I'm sure the guys there would describe the cord as "4 mm."
The heads were put on the hoops with staples. Like this:
(a) Lay the head (soaked) down with the skin side up. Put the hoop on top of it.
(b) Lift the edge of the head over the hoop and about 2/3 of the way across the inside of the hoop. Put a staple about half-way across the width of the inside of the hoop. Do this all the way around. The second staple goes directly across from the first one; then at the quarter-points, etc, so as to get the skin evenly on the hoop.
(c) Put the skin and hoop on the drum and use your tapan clamps to force it down into position. (So the staples you just put in are now hidden, facing the top edge of the shell.) Let the head dry like this.
(d) Take the clamps off and take the head-and-hoop off the shell. Put more staples into the outside of the hoop, all the way around.
(e) Take machine-made embroidered cloth tape and staple it to the outside of the hoop.
This works quite well . . . EXCEPT: this is driving staples into hard wood! I got a powerful staple gun, but still it just started the staple. I then had to hammer the staple in the rest of the way with a hammer. Many went in badly, or bent, and I had to pull them out. I think I used three times as many staples as were actually in the finished work! What a pain! If I did this again, I would try hard to find staples shorter than 1/4"/6mm. And I would buy an electric or pneumatic staple gun.
For myself, I will stick to using twigs.
The other trouble I had with this drum: the hoops were made very tight to the shell. I don't understand how the guys who made the drum got it together, with pretty much zero clearance for the ropes; obviously they did. But I had to open up the joint in the hoop, and pull it out.
6. MOUNTING STRAPS Here's what I have been doing for mounting straps:
Use 1/4" U-bolts – the usual hardware store stuff. On the inside of the drum, glue wooden blocks, to reinforce the wood and to spread the force. Drill holes through the shell and the blocks to match the legs of the U-bolts.
Now, if you just tighten up the nuts, you'll pull the U-bolts all the way down to the shell, crushing the wood of the outside of the shell. So make a "mounting plate" like this: 1/8" x 3/4" hardware store steel, about 2" long. Hit it a couple times with a hammer, so that it curves like the outside of the shell. Drill two holes, matching the spacing of the U-bolt legs, but on the tight side. Bevel the outside edges nicely. Now, when you tighten the nuts, the U-bolt pulls down to the mounting plate, and the mounting plate to the wood of the shell. Put some glue or whatever on those nuts; you really don't want them coming loose.
Here's what it looks like:
And here's a trick: heat up the U-bolt and mounting plate with a torch or whatever, so as to burn off the shiny chrome, so they are grey and look village-blacksmith.
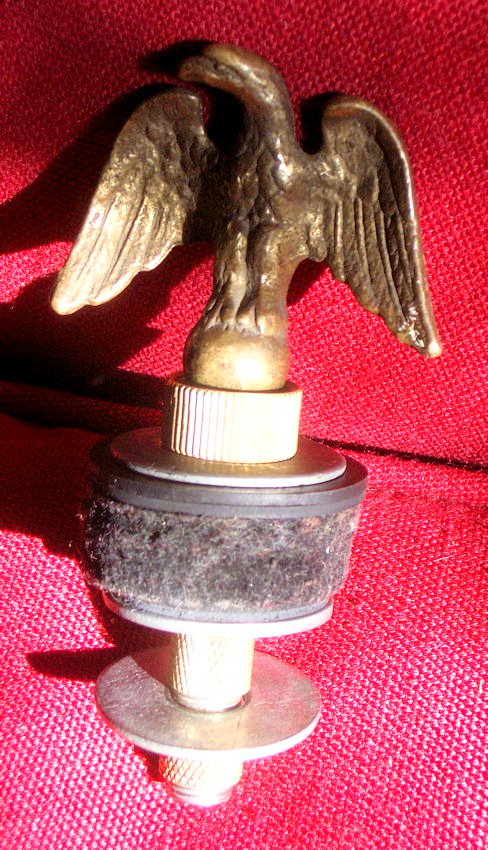
7. CYMBAL MOUNTING I mount a cymbal on a drum using the hardware stuff that they sell for lamps. The threaded shaft is called a "nipple," and the dingus it screws into is called a "bracket bar" or "cross bar" – but I will just say "dingus." Here's one: http://www.mylampparts.com/Products/Regular-Bracket-Bar---4-Long--tap-18-IPS__SL16004.aspx.
Use a 1/8" nipple, 3 or 4 inches long. The "1/8 inch" is a nominal size . . . it's about 3/8 inch outside diameter.
Basically, you mount the dingus inside the drum, with a hole drilled in the drum shell. The nipple goes through the hole in the drum shell and screws into the threaded hole in the dingus.
The hardware store will sell you various threaded nuts and washers that go on the nipple. With some sort of nut and washer on the outside, you can screw the nipple hard into the threaded dingus, so everything is very solid. The drummer gets to find nice rubber washers for the two sides of the cymbals, as seems customary. That's his or her end of the business.
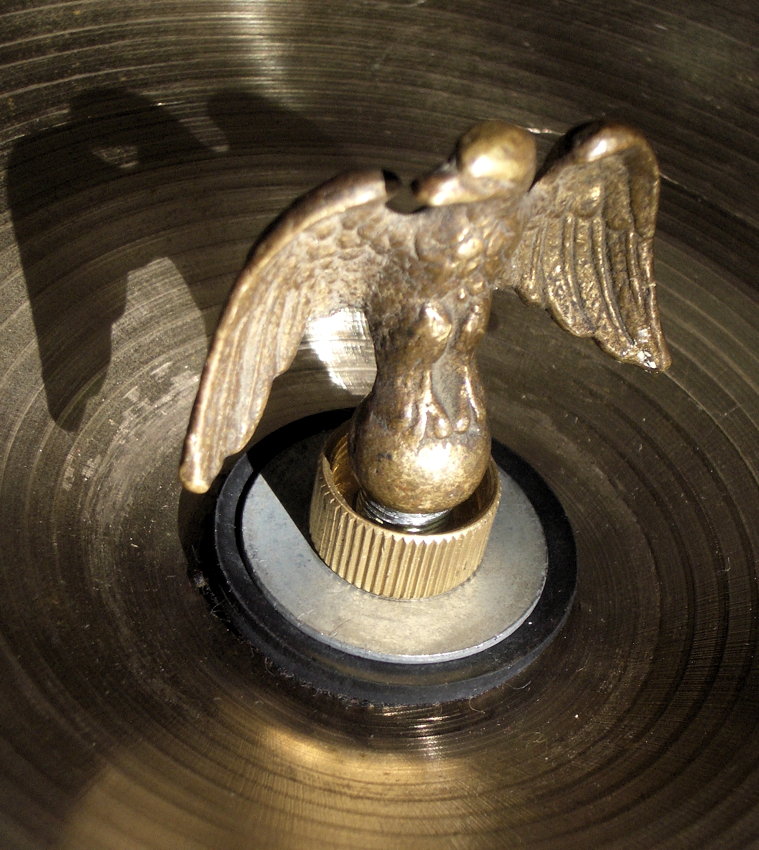
There are all sort of decorative finials you can top it off with, from a little thingy that looks like a chess pawn, to the really neat brass eagle that someone gave us.
You can just unscrew all the external part of the mounting, leaving nothing visible on the outside of the drum except a small hole through which you see the threaded hole in the dingus.
Mounting the dingus: What I do is glue a block of wood about an inch thick to the inside of the shell. (Drill the hole through the block and the shell after you glue the block in.) Then the dingus screws to the block. (This is a good place to put glue on the screws . . . you do NOT want them loosening up.)
This assumes you know how to fit a block of wood to the curved inside of the shell, so that it glues properly. If not, I suppose you could bolt the dingus to the inside of the shell, with bolts going through the shell. The heads of the bolts will be visible on the outside of the shell. I'd be nervous about this; some drum shells are thin and flimsy.
Here's what it all looks like:


Used with permission of the author.